Latest Features
Considering an Altitude Adjustment?
Tech divers like to dive deep, but have you ever considered diving high? We’re talking altitude people—places like Boesmansgat Cave, South Africa; Lake Titicaca, South America; or even Lake Tahoe, Nevada. What’s more, these high altitude dives require special knowledge, equipment, and technique to conduct safely. Fortunately, Master and Technical Instructor Benjamin Hadfield lays out the details: from theory and math, to dive computers and practical recommendations, to prepare you for a high dive! Watch your six!
By Benjamin Hadfield. Images by the author unless noted.
Across the globe, remarkable high-altitude dive sites often go unnoticed by technical divers as they consider new diving sites, opportunities, or technical challenges.
To provide context within the scope of this discussion, let’s define altitude diving as any dive conducted between 305 meters/1,000 feet and 3,048 meters/10,000 feet above sea level. While the insights shared in this article are relevant to all altitude dives, it’s important to note that additional considerations must be considered when diving above 3048m/10,000 ft.
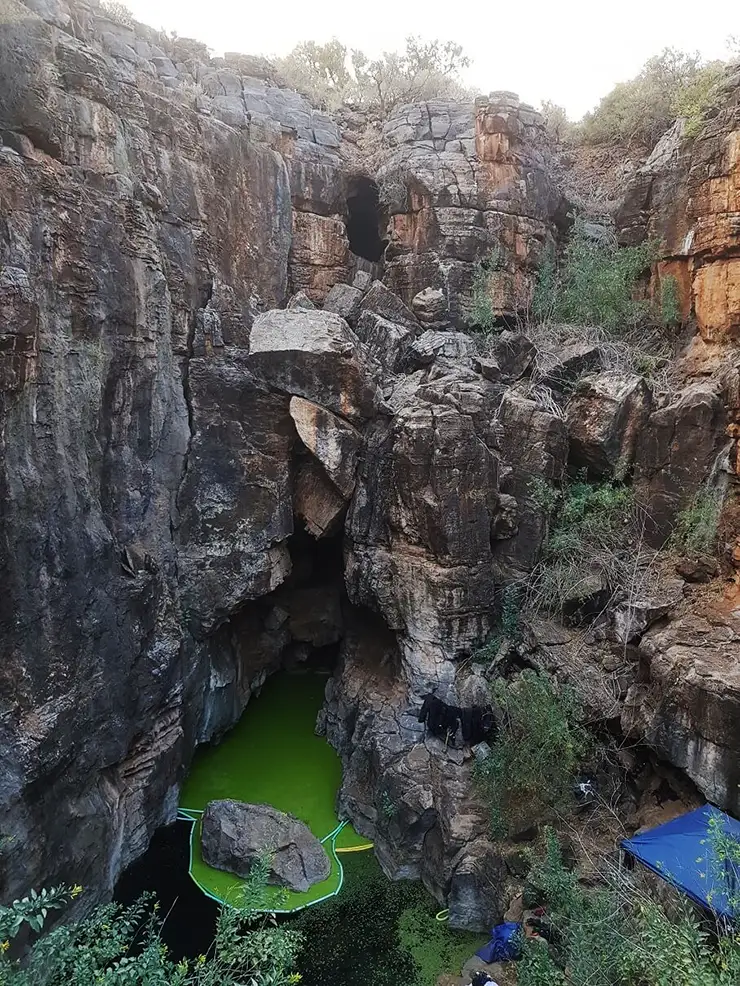
As we begin to look toward the mountains for these high-altitude dives, let’s consider, for instance, Boesmansgat in South Africa, situated at an elevation of 1,500 meters/4,921 feet with a depth of 283 m/928 ft. Similarly, there’s Yellowstone Lake in Wyoming, USA, sitting at 2,356 m/7,730 ft elevation with a maximum depth of 125 m/409 ft. While we’re looking at amazing dive site opportunities, let’s not forget Lake Tahoe, with its pristine waters that sit at an altitude of 6,225’ above sea level!

These examples only scratch the surface of the opportunities for altitude exploration and, for many technical divers, represent the only local dive options available.
In anticipation of embarking on these extraordinary high-elevation diving adventures, it’s crucial to grasp the unique considerations, challenges, and alterations to dive planning that must be taken into account.
These considerations range from basic factors such as the remoteness of the areas and thermal protection due to cold and weather, to more technical concerns like increased nitrogen load management, additional decompression requirements, extended surface intervals, higher risks of DCS and Hypercapnia, and appropriate dive planning related to decompression depths, management, and lengths.
We are going to take the time and discuss all of the considerations in their order of presentation to help ensure that your adventure to high-altitude diving is not only a fun one, but safe as well!

Traveling to your Dive Site
As you ascend to higher altitudes, there is a direct similarity between this ascent and ascending in diving from depth that results in the reduction in the partial pressure of nitrogen within the tissue compartments. In both cases, your body is off-gassing nitrogen from your tissue compartments. Certainly, the reduction in nitrogen from the tissue compartments is substantially less than diving, but it is still a consideration to account for, especially when adding any decompression obligations.
One of the factors to be aware of is that diving computers will not consider pre-dive ascents to or descents from altitude no matter what the form of transportation is.
While some dive computers will certainly measure the PO2 before a dive, unless you are prepared to leave your computer on for the entire duration of your ascent to altitude, your dive computer will have no way to accurately determine your tissue compartments’ amount or retained nitrogen.
In planning a dive at a new altitude that requires ascent, you must take into consideration the residual nitrogen that is remaining in your tissue compartments. This residual nitrogen must be accounted for as if you had already been diving. Remember, after this ascent to the high-altitude dive site, you are now off-gassing.
There are two simple ways to account for this concern
One option is to employ a straightforward guideline for estimating pre-dive residual nitrogen and travel, which involves utilizing a basic paper dive table residual nitrogen calculator. While I certainly understand that most divers may not have seen a paper dive table since their basic open water days (if they were even then), believe it or not, they do exist still.
In using this simple table, which is easily downloadable from most dive agencies, you will see a traditional table that will provide you with residual nitrogen groups that are typically arranged alphabetically with the “A” Group normally representing the least or no remaining residual nitrogen and progressively lower alphabetical letters representing more residual nitrogen. See the sample table provided by SSI for reference below.
As you review this table, you will need to adjust your residual nitrogen group by one letter group for every 305 m/1,000 feet of elevation you gained before your dive. This will give you a fairly safe estimate of the amount of residual nitrogen in your system, as well as a guide for how long you should wait before your first dive to ensure that you are starting with no residual nitrogen.
Looking at the example table, if you ascend 305 m/1,000 ft in elevation, before your dive, you would now be a “B” group diver. To return to the point of a fresh dive safely, you will simply need to wait 3 hours and 21 minutes before your dive.

Allowing yourself some time before any dive at altitude to acclimatize is always a great practice. Being well-rested and mentally prepared can be tough when you are excited to get in the water, but since we live on planet water, remember that the water will be there tomorrow.
Should you be not so inclined to use the paper table method, another way to calculate your residual nitrogen group is to simply allow for 2 hours for every 305 m/1,000 ft of elevation gained that day, before your first dive.
While this second method isn’t as accurate, it will increase your safety margin considerably and throughout the entire chart will average to this time.
Altitude Sickness and DCS
A common issue with moving to higher elevations is also altitude sickness.
In its simplest terms, anybody who ascends significantly in altitude is at risk of developing altitude sickness. Altitude sickness is caused by rapid ascent and not allowing your body enough time to adjust to reduced oxygen and changes in air pressure.
Symptoms include headache, vomiting, insomnia, and reduced performance and coordination.
It isn’t a coincidence that these symptoms are so close to those presented by DCS. Acclimatization to the new altitude is important. Making sure to start any dive problem-free should be a huge consideration for every diver.
PRO-TIP
Being well-rested and hydrated before you travel as well as remaining hydrated during your travels and before dives can make a huge difference for any dive. Simply put, as M2 describes it, the blood is the conveyor belt of the body and hydration keeps this conveyor belt from being mired down as well as remaining well-lubricated and able to transport the appropriate gasses in the direction they need to be transported.
According to many agencies, as well as the Navy, hydration in high-elevation diving is one of the biggest concerns!
Thermal Protection
While this may go without saying, let’s talk about it anyway!
Higher altitudes are colder. Colder weather makes colder water. A major consideration in reducing the chances of DCS is remaining warm throughout your dive, especially during your decompression obligation. Dress appropriately.
PRO TIP
If you use heated undergarments don’t turn them on at the beginning of the dive. Instead of this, make sure to dress appropriately and with sufficient thermal protection so that you will be warm in the water without them. Being able to increase thermal comfort at the end of the dive is far more important than at the beginning of a dive. Another consideration about using heated thermals is the possibility of failure or battery life. Make sure to prepare for the worst and hope for the best
Redundant – Redundant – Redundant
Another consideration for exploring higher elevation locations is your choices in equipment and the logistics of the added weight.
To start with, the big one is the need for redundancy in almost everything. Diving in a location like Boesmansgat, you won’t have access to simple things like dry suit seals, second-stage mouthpieces, or even simple things like a hex wrench unless you bring it with you.
Along this same line, neither will you have access to easy gas fills. In case you are accustomed to liveaboard diving and full service, let me just say… CARRYING TANKS STINKS!!! THEY ARE HEAVY! If you are planning a dive to a higher altitude, you will have the opportunity to carry tanks from home to the site with you. This can also make packing your vehicle challenging.
Another important consideration to consider is the availability of parking close to the water. More often than not, there will be a hill to climb, as well as a lengthy surface swim! Eat your Wheaties!
Finally, along with the concept of tanks and redundancy, every diver has opened a tank valve to check the pressure, only to find it has ½ (or less) the amount of gas that they thought. Taking a spare tank can make the difference between a 5-hour drive and diving or sitting on the shore with no dive.
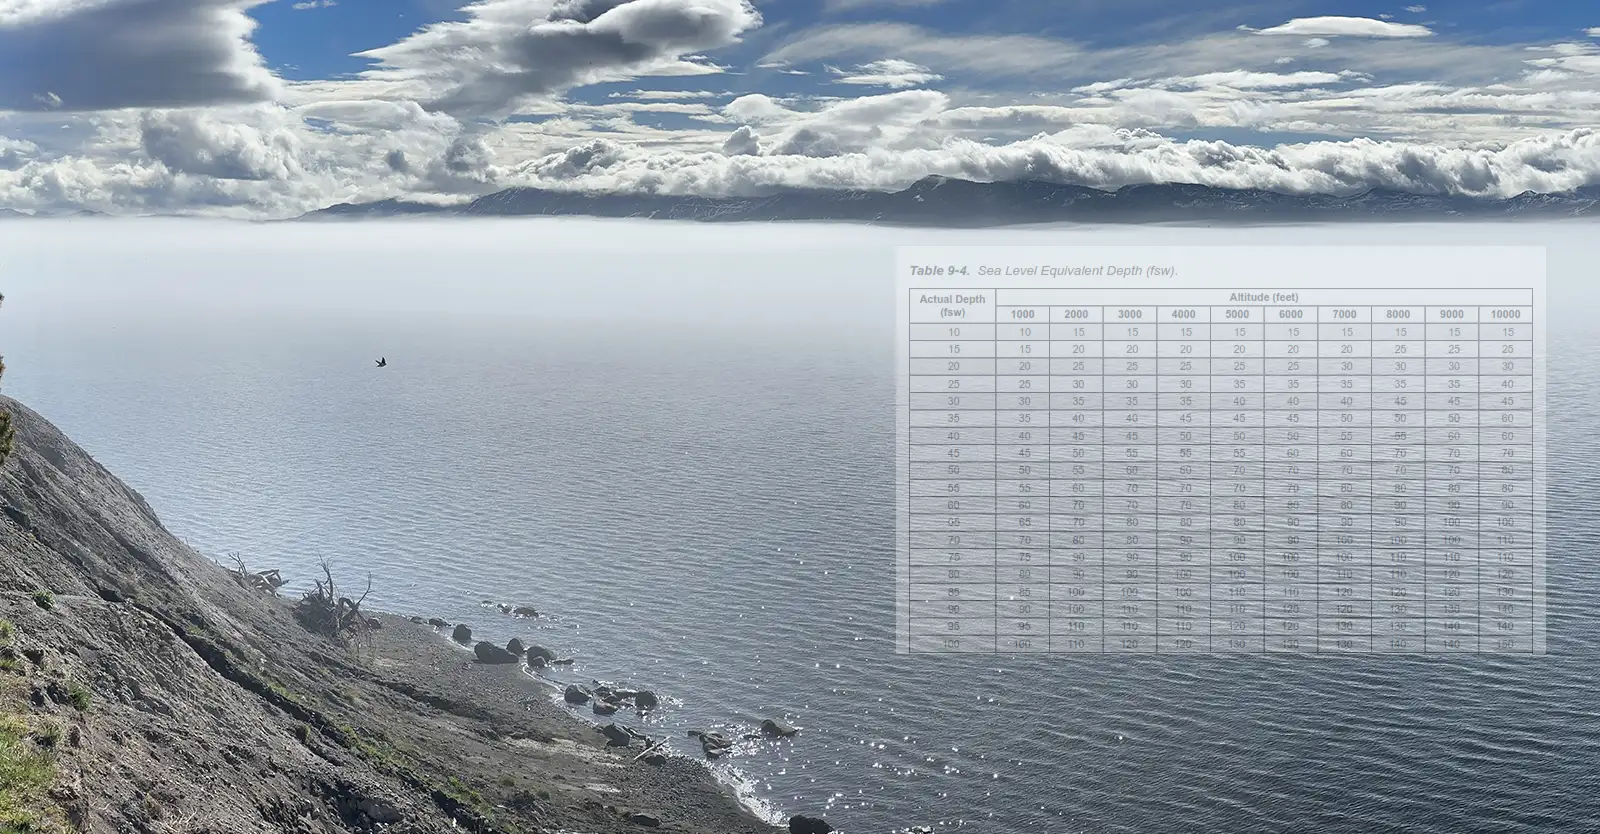
Sea Level Equivalent Depths
Why is this so important and how could this affect our dive? After all, isn’t the weight of 1 cubic foot of fresh water the same weight at 7,000 ft/2133 m as it is at sea level? 62.4 pounds/28.3 kg.
The answer is, of course, yes!
The concern and need for expressing a SLED (Sea Level Equivalent Depth) is not the depth of the dive, the time of the dive, or even the weight of the water (which, of course, remains constant). The concern is the difference between the pressure that we will be subjected to below the surface and the pressure change when we surface.
To put this into perspective, we will have an immediate change in pressure of roughly 17% when we surface at 5,000 ft/1524 m elevation! Think of it this way… If you were diving a gradient factor high of 85, this would immediately put your new m-value at 102% upon surfacing instead of your desired 85%! Who is up for a little DCS in a remote location?
As we consider the dive, we must begin to consider the altitude pressure differences and how they will affect our gas absorption values.
Luckily for us, there are several ways in our dive planning to calculate this and compensate for the drastic difference in pre-surface absolute pressure and surface absolute pressure that we will discuss, in detail, later in this article.


How should we calculate our MOD? For calculating MOD we have two considerations
As we discussed earlier, the weight of the water is the same no matter where we are in the world. With this consideration, Dalton’s Law remains unchanged. The PO2 of air at 2 ATA is still .42 and 2 ATA at 1524 m/5,000 ft in freshwater is still 10 m/34 feet. There is no special math or laws that compliment, or detract from these simple facts. The use of Sea Level Equivalent Depth is used for the amount of pressure difference between below the surface and above the surface and protects you from the absolute pressure change that you will be presented with.
Now, with all of this said, this doesn’t account for the acclimatization and or equilibration of the diver prior to their dive or the effects of lower oxygen levels (at altitude); some divers report increased sensitivity to hypercapnia, narcosis, and increased work of breathing.
While there is very little research and information on this concept, the traditional MOD depth as well as gas density limitations don’t affect all divers equally. This impact or lack of measurable impact you may face in a various diving situation can be different from day to day and may or may not affect your dive buddy the same way. For example, in the 80s, deep air diving was fairly common and many divers to this day can remember good portions of their dives, and reported no adverse symptoms.
Putting a hard number on this margin of safety is very difficult and depends on divers’ tolerances. I encourage you to consider the adage “There are old divers and bold divers, but no old, bold divers.”
In any new environment that presents additional risks or additional challenges, it is simply wise to err on the side of caution.
For me, in any deep diving at altitude, I use the gas density, PO2 limits for depth, and the Equivalent Narcotic Depths (END) for the SLED instead of the actual depth. While there are no studies that can show that this is needed, I, along with many divers, have noted an increased sensitivity to hypercapnia and narcosis at the limited depths of altitude but no additional sensitivity to these limits when diving at sea level.
The Meat and Potatoes of the Dive
With all of these considerations in place, it is finally time to talk about the dive planning portion of diving at altitude.
There are certainly a lot of ways to consider this, but as most of us know, there are a lot of software and dive computer solutions out there that will attempt to do the job for us. Having a summary understanding of how they arrive at their numbers is relatively important.
NOTE: THIS IS NOT A RECOMMENDATION, A DEBATE, or CONVERSATION ON WHICH DIVE COMPUTER IS BEST! ONLY INFORMATION!!!
Garmin Computers
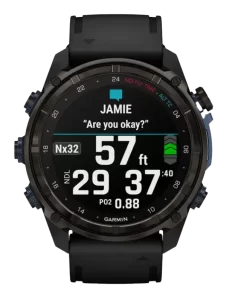
Since entering the dive computer market, Garmin daily wearable dive computers have consistently grown in popularity and use. With a huge number of features in the Garmin Dive watch series, the Descent becomes a competent daily wearable that also has a cadre of features to make an impressive dive computer. With the ability to handle dive situations from simple recreational to substantially more complex technical, the Garmin has become a true standout in the crowd and has earned its place in the dive community.
The Garmin series of Decent MK computers automatically handle the altitude adjustments needed to complete a safe dive from sea level to high mountain elevations including calculating a larger amount of nitrogen that a diver would start with before a dive due to an ascent in altitude to reach a dive site. This adjustment is done in one of three ways all of which are accomplished through the computer’s barometric pressure sensor. The first method is through automatic calibration, the second through GPS location calibration, and the final through manual altitude barometric calibration.
A feature that has truly set the Garmins apart, and is beginning to surface in other computers, is GPS capabilities. Being able to navigate to a GPS point that you entered via your phone, or manually on the watch has been amazing for sure. Automatic marking of entry and exit points with GPS is another great feature.
Garmin also has a deep history in biometric sensors and data, and the Descent line incorporates these insights to help with the user’s health and performance goals. If the users can wear the computer in direct contact with their skin the device will also display and log heart rate data, in the cases where this isn’t an option, the user can add a chest-mounted HRM to collect HR data and add this to the log via a “store-and-forward” method which pushes the data to the watch once the diver has surfaced.
While this data doesn’t change the algorithm for the dive, it does provide the diver with useful data and additional metrics that are currently unavailable with any other dive computer.
With the newest iteration of the series, the Mk3i and T2 transmitter, Garmin has now added simple diver communications as well as a “need assistance” mode that sends a message to other divers in your group, as well as assists them in navigating to the diver in distress.
Suunto Computers
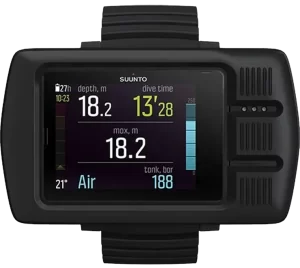
Over the last few years, I have noticed an increase in the number of technical divers using the Suunto computers in various diving situations and the growth of their use in technical diving as well.
When it comes to using the Suunto computers it is important to note that they don’t calculate atmospheric changes based on the barometric pressure they read before the dive. To track the altitude correction needed, the Suunto requires the user to select an atmospheric range for your planned dive.
- 0 – 300 m (0 – 980 ft) (default)
300 – 1500 m (980 – 4900 ft)
1500 – 3000 m (4900 – 9800 ft)
While it is great that the Suunto is taking into account the differences in atmospheric pressure and setting the decompression profile to the maximum range for the dive in question, this method is still fairly general and has the potential to create more decompression than needed in a given situation.
For recreational divers, this additional safety margin isn’t a bad thing at all, considering that the information presented is based on an 11-year-old algorithm which is believed to be great by some and terrible by others, has no real connection to the actual diver, and isn’t a bad way to process the information for your dive and remain safe.
APEKS DSX
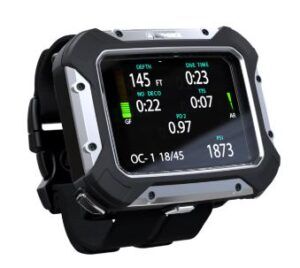
The Apeks DSX is a relative newcomer in the diving world of tech, but certainly worth noting here.
The Apeks DSX works on much the same principle as the top dive computers in this category, namely Shearwater, Ratio, and Garmin by providing the diver with information based on their current atmospheric pressure and calculating a dive profile based on this pre-dive data.
By taking this information into account before descent, the computer can adjust its algorithm to account for the new theoretical depth, while diving and adjusting the nitrogen loads accordingly. The DSX accounts for altitude changes automatically using the built-in barometric sensor. The absolute pressure value used by the decompression model is not affected by the altitude or the gauge pressure displayed and will only display actual depth and not the SLED.
Shearwater and Ratio
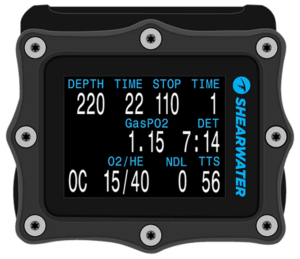
The Shearwater and Ratio computers have been a mainstay in the technical diving world for a long time. They have earned their reputation with solid performance and quality information.
With both computers, the overall atmospheric pressure before the dive is taken into account and used to determine the appropriate pressure differentiation to correctly build a decompression profile based upon the new theoretical depths the diver will descend to. It is certainly important to note that humidity, temperature, and weather conditions will have an impact on the readings, but overall, these changes will be fairly minor in their impact.
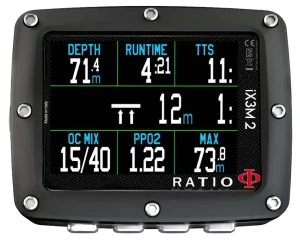
One of the considerations in using these computers is their measuring of atmospheric pressure, before ascending to the chosen altitude. Most divers place their computers in their dive bags in the off position, not giving the computer a chance to fully measure atmospheric pressure changes before the the dive. It is important to note that any ascent to altitude will create a residual nitrogen profile in the body of the diver, and the first dive of the day, at altitude, should be considered a repetitive dive. See the earlier section, “Traveling to the dive site”.
Another concern comes in the understanding of the calibration characteristics when using CCR at altitude as well as understanding the Oxygen sensor calibration. For example, when diving at 2697 m/8,848 ft elevation, the PO2 reads .15 instead of .21 (when the sensors are exposed to air) and should read .70 instead of 1.0 (when the sensors are exposed to 100% oxygen). Not allowing for or calibrating your unit and computer can cause major issues and need to be addressed carefully.
For further information on calibrating your Shearwater for altitude diving and CCR, refer to this InDEPTH article: Calibrating Rebreathers Equipped With A Shearwater HUD At Altitude by Michael Thornton and Josh Thornton


MATH MATTERS
For a very long time, I have firmly believed that it is important to not only be able to use the available resources like dive computers and dive planners to access the information, but I have also felt that it is equally important to understand how to do the math on your own if SkyNet were to ever fail you.
Calculating Sea Level Equivalent Depth can be done in one of three ways. Here they are from most complex (and most accurate) to simplest (and least accurate).
Method 1
Starting with the accurate Barometric pressure for the dive site, as close to the dive time as possible increases your accuracy in planning considerably. Atmospheric pressure is fairly variable and is affected by clouds, storms, humidity, and temperature. For example, you will notice a .01- .02 shift for every 10 F of temperature difference, in other words, colder air is denser than warmer air. Humid air is denser than dry air.
Once you have the station pressure in ATA for your location, you will need to determine what the closest sea level ATA station pressure is. For simplicity, you can certainly use 1.0 ATA and this will make very little difference in any dive planning, but if you are looking for ultimate accuracy, you will use the actual Sea Level ATA.
Once you have these two measurements, it is a matter of dividing the two to determine the difference (or in the case of simply using 1 ATA, subtract). For example, if your local station at 4,699 ft/1432 m elevation is reading an atmospheric pressure of .8353 and a pressure at sea level of .9927 this would equal .8414 ATA or a difference of .1586. By adding 1 to this number we have a new value of 1.1586 or 115.86% of value.
This would equate to a dive at 30m/100 ft having a SLED (Sea Level Equivalent Depth) of 35.3 m/115.86 ft
This would also affect your final safety stops and decompression stops by the same factor. Therefore, a normal 6m/20 ft safety stop would now need to be shallowed up to 5m/17 ft instead for the same effect.
Method 2
If you aren’t so inclined to do the math, there are certainly plenty of tables available in printed form, online calculators as well as dive planners like multi-deco and subsurface that can assist in dive planning for you.
In using any dive planning software, make sure to always set the altitude to the appropriate setting to ensure accuracy.
While all these options will create a more general SLED, they will also be reasonably close to general dive planning.
Method 3 (The Cheater)
For this method of calculation, we are going to do a bit of a throwback to the old “on the fly, deco obligation calculations.” Otherwise known as keeping it simple.
Long ago, before the wiley Perdix was a twinkle in a designer’s eye, we all had to be able to do some simple decompression calculations in our heads based upon “the tables” we used to plan our dives with and to know what to do when we broke the tables. In those days, we also had to keep it simple enough to be able to remember how to do them when it came time!
Much like a simple math of 3.5% deeper for every 305 m/1,000 ft will also work reasonably well. While this isn’t as accurate as the first two methods, it will place your dives fairly closely and provide a slight safety margin as well!
Diver, Heal Thy Self!
Another consideration for diving at high altitudes is the consideration of medical help, location of O2, and distance to a chamber should there be an emergency.
Diving at high altitudes and as not only a recreational instructor but also a technical diving instructor, my wife and I have taken the time to build a complete first aid kit with two O2 bottles, an automated external defibrillator (AED), and anything else that could be needed in the event of an emergency. We stocked it with pulse/Ox meters, cardio monitors, as well as anything we could think of that could be needed for bumps, bruises, breaks, and bleeds.
We have realized that we are not very close to emergency resources and that, in the event of an emergency, we will need to be prepared to render aid to ourselves or someone else while we wait for medical assistance to arrive, which at times could be problematic at best.
In many of the locations where we dive, cell phone service is spotty at best and non-existent at worst. Even resources such as the Garmin InReach still take time to work and direct the appropriate service to your location. In an emergency, time matters. Having the resources available directly can make a huge difference!
Increased risk of DCS at Altitude?
While it is true that there are substantially fewer reports of DCS for dives at altitude, it is also true that these dives represent a very small percentage of the overall dives done in a year.
It is also important to note that the symptoms of DCS are often overlooked or dismissed by many divers. Simple symptoms like tiredness, headaches, and light joint pains are often ignored and attributed to long days, age, travel, and a litany of other reasons.
As we begin diving in remote locations at these higher altitudes, the susceptibility of DCS increases considerably due to the sudden decompression that occurs immediately after breaking the surface. The lower the absolute pressure (higher the altitude) of the dive site, the more dramatic this sudden shift will be.
During one of my recent altitude classes, one of my students compared this to a sudden loss of cabin pressure in an airplane. While it is certainly not this dramatic, the analogy is sound. When ascending, at an altitude of 1524 m/5,000 feet, you are making a 17% change in absolute pressure in the space of only a few feet. While I am not sure that this would rise to the level of “explosive decompression,” it is certainly an extreme and fast change. This change is increased in magnitude by every set you make toward higher elevations you will be diving.
Taking precautions such as using the SLED (Sea Level Equivalent Depths) to modify and measure the amount of nitrogen absorption, shallower decompression, safety stops, slower ascents and more consideration of the residual nitrogen in your bodies before/after a dive will help reduce the chances for DSC. Remember that in diving, a little conservatism goes a long way.

Traveling after diving
Many dive sites at higher altitudes are located in a caldera, impressionion, valley, or surrounded by mountains. In leaving many of these dive sites, you will be required to ascend after diving. While this altitude ascent will not be as dramatic as boarding a plane, it is certainly something that MUST be taken into consideration.
As we discussed earlier, ascending to altitude is a process that is much like ascending in diving. While ascending, your body will be reducing the residual nitrogen left over in your tissue compartments and you will simply be “off-gassing”.
Using a simple rule of waiting two hours after a dive at your current altitude for every 305m/1,000 ft you will gain in altitude is just smart gas management. While you certainly wouldn’t dive and board a plane after your dive, you should allow yourself the same safety precautions before leaving a dive site that will force you to ascend in altitude.
Final Thoughts
As you progress through your diving career, don’t forget to look toward the hills for acceptable diving opportunities, they are certainly there and while this article is designed to be informative and helpful, IT DOES NOT REPLACE PROPER TRAINING! Before you venture into altitude diving, make sure to find a qualified and experienced instructor like me or my wife who has the proper training and experience to ensure that your high-altitude adventure is on track, safe, and enjoyable. YouTube-certified divers are becoming more and more prevalent and this is certainly scary for sure. Nothing replaces the knowledge learned from a qualified and experienced instructor.
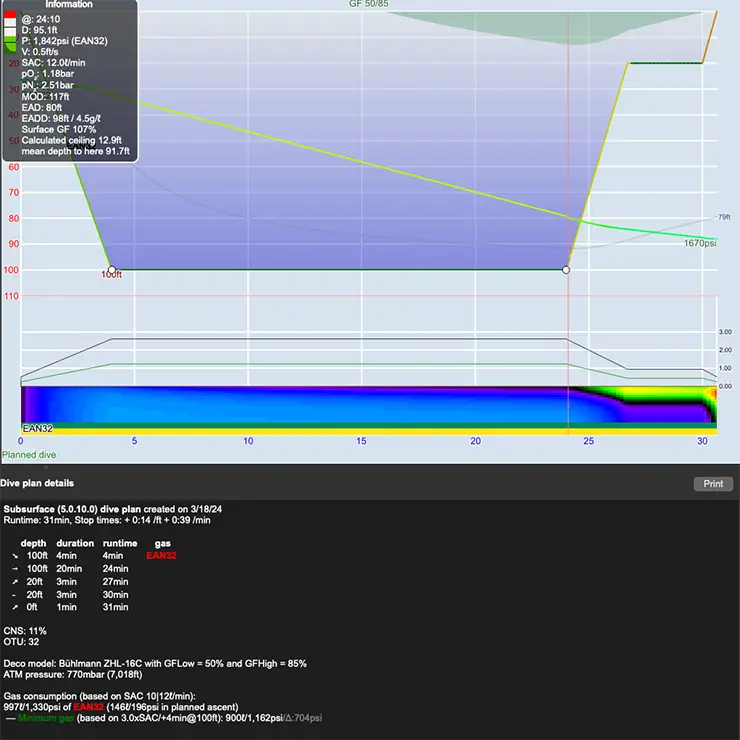
EXAMPLES
Below we see two examples of dives.

24 minutes Total Bottom Time (including 4 minutes of decent)
EAN 32 Gas
50/85 Gradient Factor
Gas Density 5.15 g/L (EAN 32 = 1.30764 g/L @ 1 ATA. 100 FFW (34’ per ATA freshwater = 3.9411 ATA)
For more information on altitude training, altitude pegs/charts/spreadsheets, or dive opportunities in high altitude, please reach out to me directly on FaceBook at “Teach Me to Dive.”
DIVE DEEPER
InDEPTH: Feeding the Exploration Bug: Plumbing Cuvel Cornet, a high altitude cave in Switzerland By Bruno Moser, translation by Veerle Sterken
InDEPTH: Calibrating Rebreathers Equipped With A Shearwater HUD At Altitude By Michael Thornton and Josh Thornton
InDEPTH: A New Look at In-Water Recompression (IWR) by Reilly Fogarty
X-Ray: Pushing the Altitude: The Quest to Document the SS Tahoe by Michael Menduno

Benjamin Hadfield is a Master Instructor and technical diving expert and instructor through SSI. Based in Idaho, his passion for diving education extends far beyond the conventional boundaries. Benjamin extends his teachings through his engaging YouTube channel, “Teach Me to Dive.” There, he shares a trove of freediving classes, reviews, and how-to guides, inviting divers into the world of exploration. Additionally, his channel hosts insightful interviews with the foremost figures in the diving community, offering a holistic perspective on diving. With his wife and partner Nikki, Benjamin immerses himself in the world of high-elevation lakes and rivers, specializing in technical sidemount diving. His explorations delve into the geological marvels of Yellowstone Lake’s features and geothermal vents, showcasing his unwavering curiosity and penchant for uncovering nature’s secrets.


Dial In Your DCS Risk with the Thalmann Algorithm

Deep Tunnel Workers Go Trimix

La Grande Dérive

California Dreamin’

British Invasion—Thailand Karst Edition 2024

Harnessing the Power of ‘Educated’ AI to Improve Diving Safety