Education
Calibrating Rebreathers Equipped With A Shearwater HUD At Altitude
Rebreather instructors Michael and Josh Thornton describe how to calibrate your Shearwater-equipped rebreather to dive at altitude; it’s something they do frequently. Are you ready to get high, and then get down? Good! Do these steps first.
By Michael Thornton and Josh Thornton
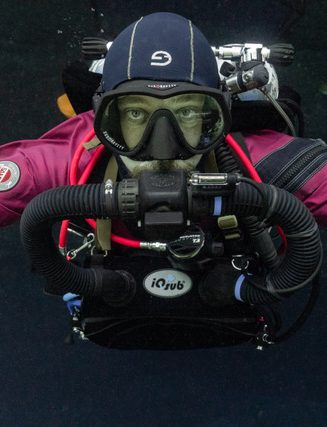
Header Image: courtesy of Josh Thornton
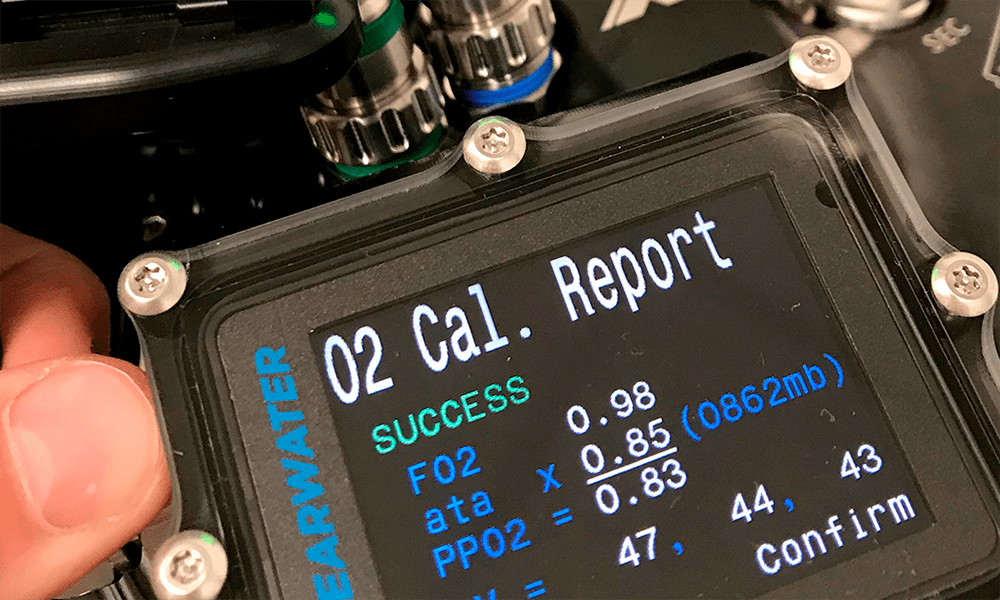
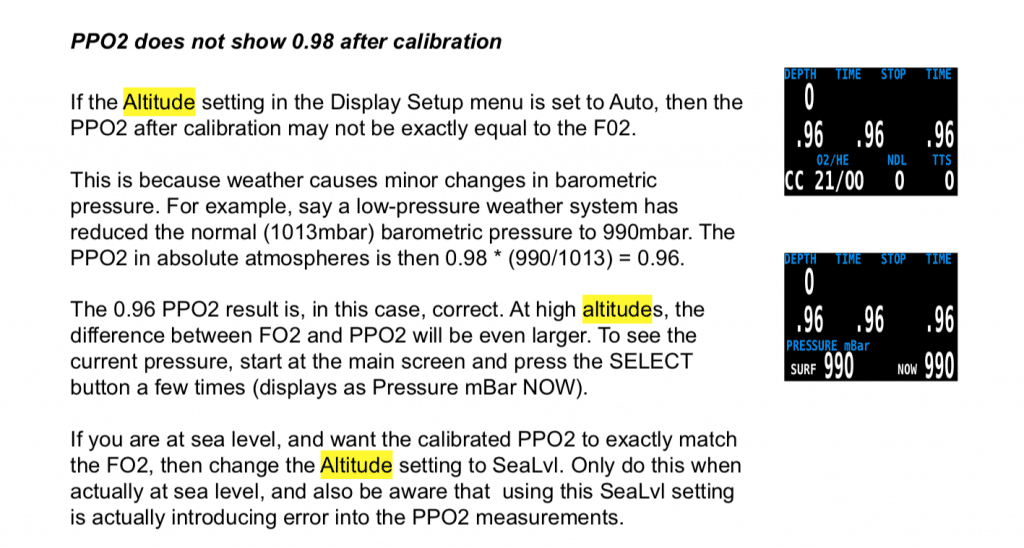
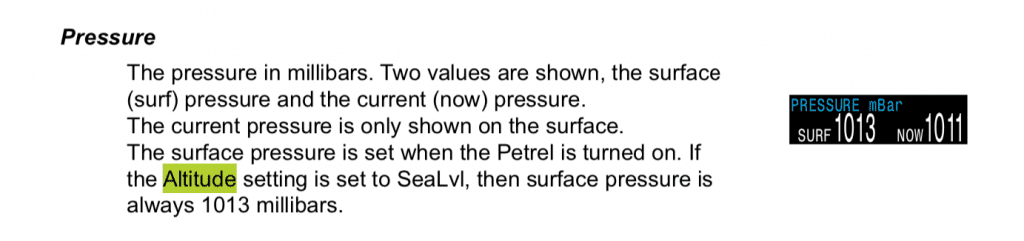
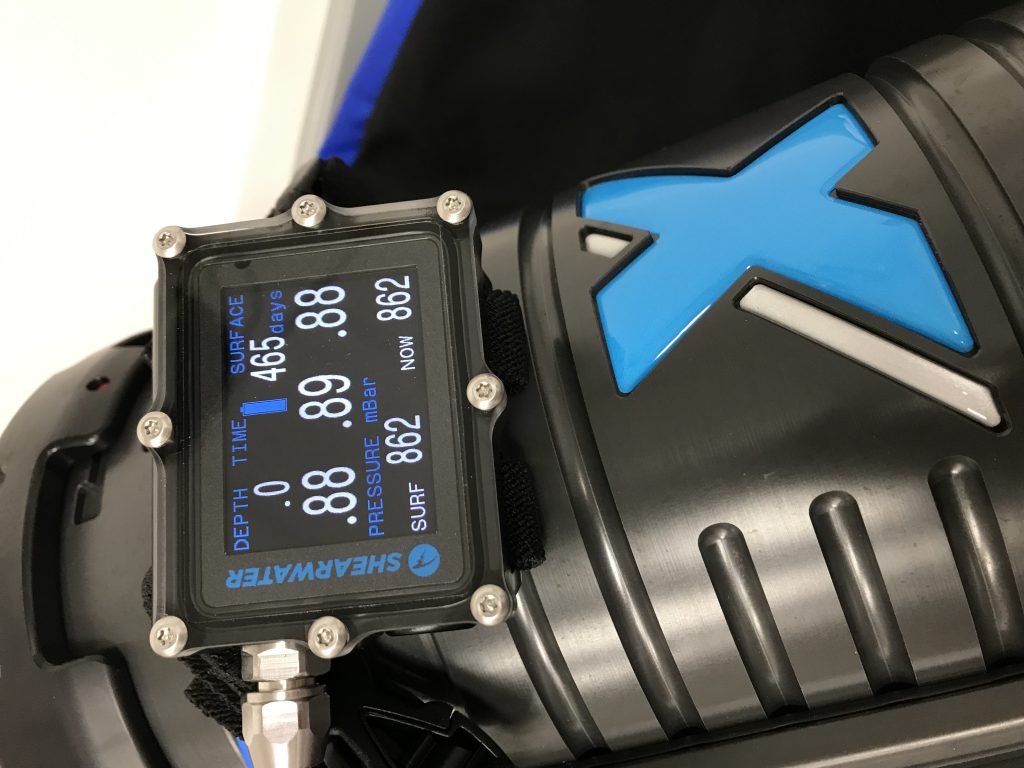
Diving rebreathers at altitude requires additional steps for calibration to ensure the pO2 display is accurate. At 4500 ft/1,372 m elevation, the atmospheric pressure is an average of 859 mBar (0.85 ATA) as opposed to an average of 1013 mBar (1 ATA) at sea level. This means when the rebreather loop is flushed with 100% oxygen, the pO2 display should be reading 0.85 and NOT 1.00 (Actually 0.98 — Shearwater’s default value).
You may ask: who dives rebreathers at altitude? Many people do.
The altitude of Salt Lake City, Utah is approximately 4500 ft/1,372 m. Dive shops in this area frequently teach open water courses at 6,000 ft/1,829 m and frequently dive and teach at lakes such as Fish Lake, which is at altitude just shy of 10,000 ft/3,000 m. Similarly, Lake Tahoe, which straddles the borders of California and Nevada, is at an altitude of 6,220 ft/1,897 m. There are many popular dive sites at altitude.
If a diver decides to dive a rebreather at altitude, it is important that they know how to properly calibrate the machine for that altitude. When diving at Fish Lake, for example, the pO2 reads .15 instead of .21 (when the sensors are exposed to air), and should read .70 instead of 1.0 (when the sensors are exposed to 100% oxygen).
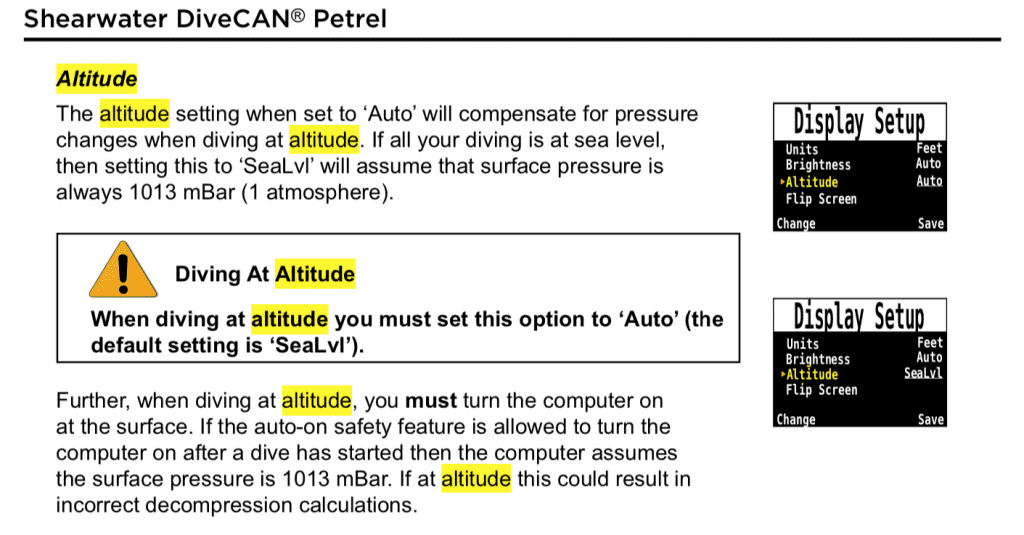
Older Shearwater firmware for the primary handset allowed the diver to choose between a “sea level” setting and an “auto” setting in the altitude settings for the controller. Depending on the firmware, the diver may need to select “Auto” in order to calibrate at altitude. The specifics of this are covered in the user manual of the rebreather.


Newer Shearwater firmware defaults to an altitude setting where the controller uses the pressure sensor to determine atmospheric pressure, and allows for an accurate calibration at higher altitudes where the atmospheric pressure is less than that at sea level. For example at 4500 ft/1,372 m flushing with 100% oxygen and calibrating the handset in altitude mode will display the correct pO2 of 0.85.
However, since the Shearwater Heads Up Displays (HUDs) do not have a pressure sensor, if calibrated at 4,500 ft/1,352 m using the button interface, the HUD will incorrectly display a pO2 of 1.0 instead of 0.85. Unfortunately, if the HUD pO2 reading differs by 15% from the controller handset display, it can no longer safely be relied upon for pO2 monitoring. For example, if a diver calibrated their rebeather at Fish Lake without the proper procedure, the HUD would be off by 30%. There are, however, ways of calibrating the HUD correctly at altitude.
Calibrating DiveCAN HUDs
The newer Shearwater HUDs utilize the digital DiveCAN bus making them easier to calibrate at altitude (or with less than 100% oxygen) than the older analog HUDs. The diver interfaces with the DiveCAN HUD via a single button on the side of the HUD. This is used for powering on the HUD, calibrating the HUD, and acts as a wet switch. The DiveCAN HUD is connected via a cable to a circuit board located inside the head where the actual calibration is stored; the HUD itself is simply a display and an interface. There is a connector on the cable so that the HUD can be detached from the head.
In order to calibrate the HUD at altitude, the diver first detaches the HUD, then plugs the Shearwater controller handset (or another DiveCAN device such as a DiveCAN NERD) into the HUD connector, and then calibrates using the altitude mode and the pressure sensor in the handset. The resulting calibration is stored in the head. When the HUD is reconnected back into its original connector, it will display the pO2 correctly. In summary, the diver used the handset to calibrate the HUD port as well as the handset port.
Another option is to use a pressure pot to pressurize the sensors to 1.0 before calibrating the HUD using the single button interface calibration procedure, but this is obviously not as convenient. The diver would need to calibrate the handset at ambient pressure, and then calibrate the HUD using a pressure pot with a pressure of 1 ATA.
Calibrating analog HUDs
Calibrating Shearwater Analog HUDs at altitude usually requires a pressure pot. There is no way to tell the HUD that it is being calibrated using anything other than 100% oxygen at sea level. There are no connectors allowing the handset and HUD to be swapped for calibration. At lower altitudes, where the difference in pressure from sea level is small, the diver may be able to over pressurize the loop to mimic sea level pressure. After performing an altitude calibration on the primary handset at ambient pressure, the diver could then pressurize the loop until the handset reads 1.0 and then proceed to calibrate the HUD.

At higher altitudes, it is impossible to pressurize the loop sufficiently to reach 1.0 pressure. Ideally the rebreather head will attach to the top of a pressure pot. If such a pressure pot is not available, there are smaller pressure pots designed to accommodate only the oxygen sensors. These pressure pots are fitted with wires and connectors to enable the oxygen sensors to be plugged into the head.
This allows the diver to isolate the oxygen sensors and pressurize them to 1 ATA to mimic 100% oxygen at sea level. With the sensors pressurized to 1 ATA (sea level) and flushed with 100% oxygen, the HUD can be calibrated. Care is needed to ensure the sensors are then placed back in the head in the correct order so that the calibration remains accurate.
Although the removal of the sensors for placement in a pressure pot can be tedious, there is the added benefit of being able to test for current limitation and linearity above the intended pressure range of use. This same pressure pot calibration method can also be used on DiveCAN HUDs if desired.
Calibrating with less than 100% oxygen
In many remote destinations, oxygen is produced with oxygen generators, which are often only capable of producing 92-94% oxygen. Calibrating a Shearwater DiveCAN HUD with less than 100% oxygen requires special procedures.
On the primary handset in “System Setup” the diver can edit the percentage of oxygen to whatever is in the calibration cylinder. So when set to 92% after a full flush, it will calibrate at 0.92 ATA (or slightly less depending on altitude/barometric pressure etc). The DiveCAN HUD can be calibrated using the same procedure as outlined above for altitude calibration. (Plug the handset into the HUD connector and calibrate using the appropriate oxygen percentage and using the pressure sensor of the handset).
Calibrating an analog HUD once again usually requires the use of a pressure pot. However, after calibrating the handset the diver may be able to over pressurize the loop to achieve a pO2 of 1.0 inside the loop if the percentage of oxygen is not too low. With less than 100% oxygen, the diver will need to pressurize the sensors over sea level pressure until the previously calibrated handset displays a pO2 of 1.0. It may be easier to keep a bottle of 100% oxygen purely for calibrating the HUD to avoid these extra steps.
Additional considerations when using less than 100% oxygen
Even after correct calibration has been achieved, there are dangers associated with using less than 100% oxygen. When oxygen is produced using an oxygen generator, which again yields only 92-94% oxygen, the remaining gas is mostly argon. Unfortunately, argon is extremely narcotic at depth, and with a density of 1.78g/l compared to nitrogen’s 1.24g/l, will cause a higher work of breathing.
On a fully closed rebreather, at a constant depth, only “oxygen” is injected into the loop. However, if the injected oxygen contains argon, the fraction of argon in the loop will continually rise throughout the dive, as the body metabolizes the oxygen, leaving a residual of argon in the loop with each injection. To counteract this, periodic loop flushes need to be performed, any time less than 100% oxygen is being utilized.
From Shearwater Research: Note that the Shearwater user-adjustable default value is actually 0.98 vs 1.0, so handsets could read 0.98 after normal calibrations, not 1.00 depending on the value the user defines. Also, another method for altitude calibration is to calibrate the handset and HUD at sea level (or in a pressure pot on bench at home), then travel to the dive site (and just maintain previous calibration). Remember that calibrations are NOT required before every dive, and in fact less frequent calibrations have benefits. It is probably also worth mentioning the DiveCAN connectors are not intended for very frequent plug/unplug cycles, so it is best to keep these to a minimum. Also a note to take care not to overstress and the connectors when doing the plugging/unplugging and to inspect for any damage or corrosion.
Note: The iQsub X-CCR has 3 electronics ports (1 for a controller and 2 for secondaries) This allows the diver to use a primary/controller handset, a secondary handset and a HUD. If you use the secondary handset to calibrate the secondary port it will calibrate based on the altitude measured using the handset’s pressure sensor and this will calibrate both secondary ports. No swapping of the HUD and Handset is required.
DIVE DEEPER
He needed to calibrate! GUE explorer Martin McClellan was determined to conduct an extensive photogrammetric survey on the wreck of the 19th century steamship SS Tahoe, which rests intact on a steep underwater slope at a maximum depth of 470ffw (144mfw) beneath Glenbrook Bay in Lake Tahoe, Nevada, at an altitude of 6,220 ft/1,897 m. Pushing the Altitude: The Quest to Document the SS Tahoe

Michael Thornton started diving in 1998 and has been an addict ever since. He was certified OC Full Cave at age 15 and began teaching technical diving courses through the family dive store, Dive Addicts, Draper, UT in 2006. Michael is a rebreather, cave, and advanced mixed gas Instructor Trainer through TDI and IANTD. Recently he became a GUE Fundamentals instructor. He and his family launched SubGravity in 2014, which emerged out of a desire to safely explore and experience the underwater world in some of the most extreme and demanding environments imaginable. Michael is also a co-founder of TEKDiveUSA, the biannual North American advanced and technical diving conference.
Josh Thornton, a co-founder of TEKDiveUSA, has been diving for 23 years, and teaching for 17 of those. Josh took his OC Full Cave Course in 2004 and has been completely obsessed with cave diving ever since. He is the training director at Dive Addicts, and a CCR adv mixed gas Instructor Trainer and CCR cave instructor for TDI and IANTD. He is also a co-founder of SubGravity.


Dial In Your DCS Risk with the Thalmann Algorithm

Deep Tunnel Workers Go Trimix

La Grande Dérive

California Dreamin’

British Invasion—Thailand Karst Edition 2024

Harnessing the Power of ‘Educated’ AI to Improve Diving Safety